
Microcasting Basics
Broadcasting is reaching a lot of people with a radio signal; microcasting is just a smaller scale

This essay was written over twenty years ago, so some of the specifics no longer apply, but the basics are all still true.
By Tom Roe
While there are countless reasons to launch a low-power FM transmission, CB communication, or walkie-talkie message, there’s only one way to send that signal: someone makes a noise and sends it through an array of electronic parts that create a wireless wave of electromagnetic energy, which is released through an antenna. While ìmicrocastingî is not difficult, it is an exact science where the signalís path cannot be interrupted, so it is important to do it correctly.
Microcasting is just like broadcasting, except not as powerful. There is no universally identified line in the sand between what constitutes a low-power microcast, and a large broadcast (in the United States, 100 watts serves as a dividing line among FM transmitters). In general, microcast transmissions cover rooms, buildings, or neighborhoods, while broadcasts reach entire cities and large regions. Short wave (also known as Ham radio) communication is broadcasting, as the signals can be sent around the world. FM radio can be either, from 100,000- watt transmitters sending signals from giant towers, to a tiny, cigarette lighter-size transmitter that lets you hear your iPod on your car stereo. Microcasting, largely the focus of this essay, can be done quickly, easily, cheaply, and can be made into a mobile operation. It also works well in conjunction with other transmissions on other parts of the spectrum, to create relay stations, field reports, and to add other voices. Setting up a full-time station could cost between $1,000 and $1,500, depending on what you are attempting. You need a microphone, a mixer, various audio components (CD player, computer, turntables, etc.), a transmitter, power supply, coaxial cable, antenna, limiter/compressor, and power supply.
What are you putting on the air?
Whether you are interested in setting up a full-time radio station or a one-day art installation, you should start first by thinking about your content. This may be in conjunction with a large group, an entire community of listeners, or just yourself. But there’s not much point going to the lengths described below if you donít have well-considered content to bestow.
Choosing a frequency
You need to select a frequency and learn more about legal regulations in your area. First, search your radio dial for empty spots. Then find out what government body regulates the airwaves in your country, and what rules they have go about using radio. If you are in the United States, go to the website of the Federal Communications Commission (www.fcc. gov). There, if you take the time to wade through all the bureaucratic jargon, is all the information about what authorized organizations use which frequencies in your area (In the United States, only ultra-low power transmissions that cover rooms are allowed without an elaborate and costly application processes). You also want to repeatedly listen to the FM stations or CB channels that you are considering using, as unauthorized organizations might also be using the frequency you choose, sometimes only occasionally or for a few hours a day. In New York City, for instance, one unauthorized station on 91.9-FM microcasts between 10 p.m. and midnight every day for over five years.
If looking for an FM frequency to use in a rural area, you should use a third-adjacent frequency if possible. That means, if you hear a station on, say, 88.9-FM, then you want to be three stations away, on either 88.3-FM or 89.5-FM (radio stations are on odd-numbered frequencies in the U.S.). In urban areas, the radio spectrum is likely so crowded you will have to be on a second-adjacent frequency, either 88.5-FM or 89.3-FM. You never want to be only one station away, on 88.7-FM or 89.1-FM, as that is a sure way to interfere with another station, or, more likely, to have your signal drowned out by the other station. You want to make sure you are separated from other signals on both sides of your frequency. Most FM radio receivers can tune in between 88.1 and 107.9, so you probably want to choose one from those parameters. 87.7, additionally, can be picked up by many radio receivers, and also is where audio for Channel 6 on American televisions lies. So if there is no Channel 6 TV station in your area, you can use televisions as radios to receive your audio signal if you transmit on 87.7-FM.
Choosing a transmitter
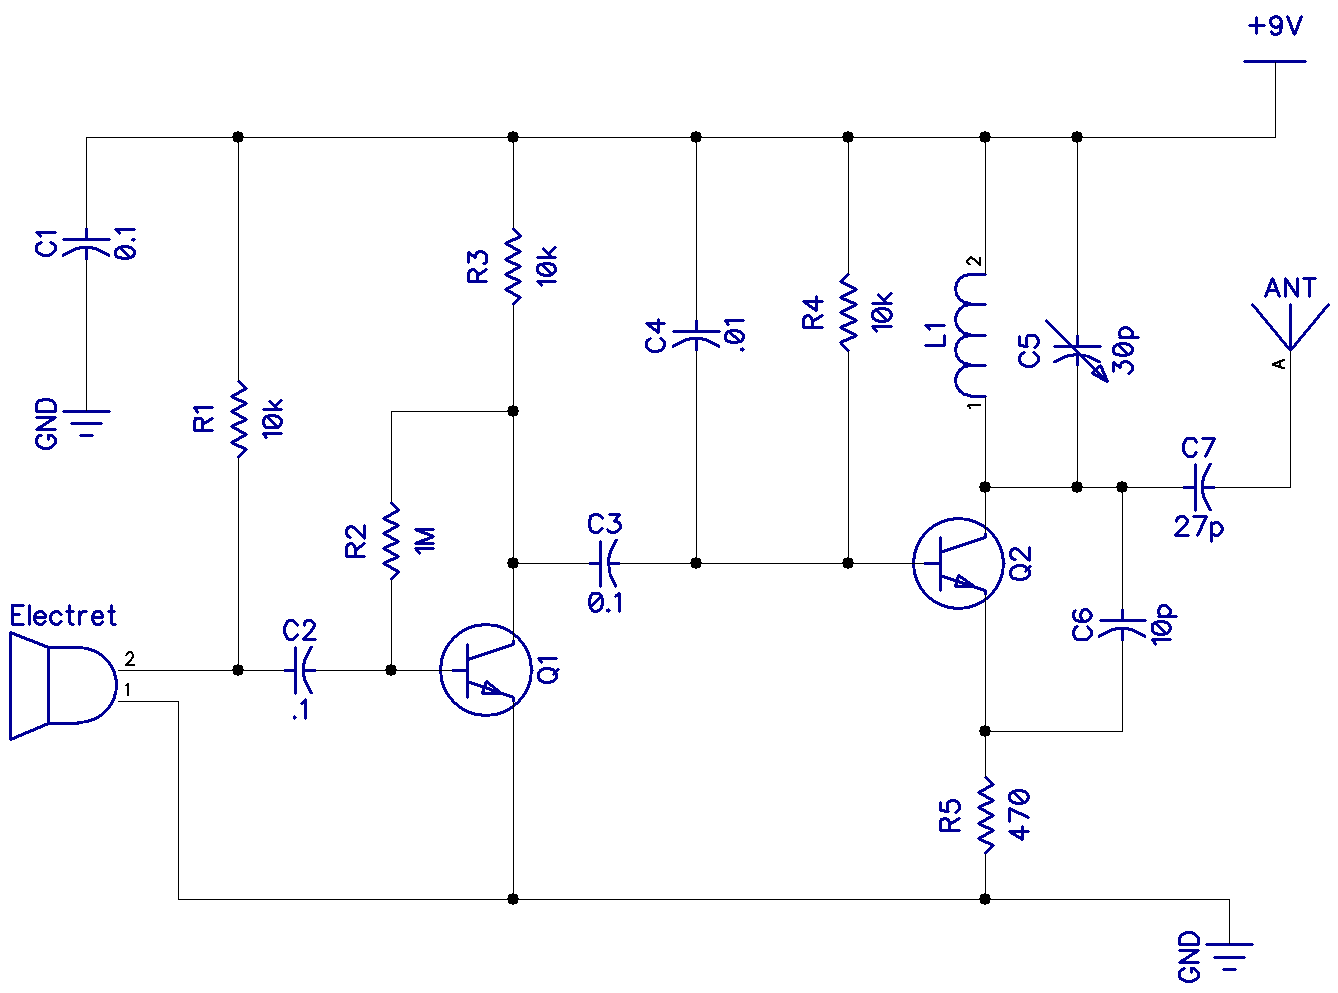
After you figure out what you will microcast, and on which frequency, you need a transmitter. Do you feel comfortable soldering a kit together from scratch, or do you need a transmitter built for you, so you can just plug it in and start your show? No matter what type, your transmitter will have three connections to outside equipment: one to a power supply, one to an antenna, and one to an audio source. Here’s a very brief survey of a few FM transmitter kits and plug-and-play models available, and make sure to get one that includes a low-pass filter:
VERONICA
https://www.veronica-kits.co.uk/
Veronica makes the best transmitters, if you want to spend money on a pre-built transmitter that works perfectly. Many of independent transmitter builders use their parts, as they are the best made transmitters available. They also have kits available.
BROADCAST WAREHOUSE
www.broadcastwarehouse.com OUT OF BUSINESS
Broadcast Warehouse has good transmitters and kits. Best buy is a 1- watt with only minimal soldering that anyone can do.
FREE RADIO BERKELEY
Free Radio Berkeley’s Stephen Dunifer leads the microradio movement, and makes good transmitters, and often gives classes and lectures.
TETSUO KOGAWA SCHEMATICS
http://anarchy.k2.tku.ac.jp/radio/
Japanese artist Kogawa kickstarted the microradio movement during the 1980s in Japan, and his site has extensive designs and do-it-yourself advice for those not afraid of soldering delicate electronics.
RAMSEY
Ramsey makes the cheapest do-it-yourself kits. This may be a good place to buy a cheap transmitter kit and learn to solder.
Also, check online auction sites, as many different types of transmitters are available there. While a transmitter from an auction site should be ready to turn on and come with the necessary accoutrements (see below), many of the others might require minimum soldering, or you will need additional equipment.
Once you figure out which transmitter or kit is best for your needs and skills, and the transmitter has arrived and you have put it together, you still need a few other things. For one, get a small fan, and aim it at your transmitter during use so it does not overheat.
Power supply
You will also need a power supply. Most likely you have a transmitter that requires a 12-14 volt power supply. You can either get a small 12 volt lead-acid battery that is very mobile but will last only a few hours (rechargeable batteries are recommended), or a supply that plugs into an outlet. Most likely your transmitter will have a black wire and a red wire that each need to be attached to the battery or power supply. Make sure you attach the red to the positive post and the black wire to the negative post, or you will break your transmitter beyond repair.
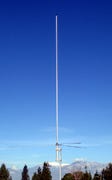
Antenna
Don’t plug in your transmitter yet, though. You also need an antenna. Never hook up your transmitter without an antenna. Your transmitter is creating a wireless wave, and your antenna is necessary to release it. If the wave is trapped, it will ruin your transmitter.
There are a variety of antenna possibilities. Do you want to transmit in all directions, or are you targeting a specific area? Again, do you feel comfortable making your own antenna, or do you need to buy one ready-to-go? Building a receiving antenna is fairly easy, as anything that conducts electricity is an antenna (your body, for instance, could be an antenna, but not a very good one). Transmitting antennae are more complicated, as they must be made to match the size of the wave you are creating. Dipole antenna are a common type for omni-directional transmissions, and Yagis are better suited for directional microcasting. Comet makes an antenna that is relatively easy to use and perfect for repeated mobile operations. Attach a 50-ohm coaxial cable (available at electronics shops as RG211 coaxial cable with PL259 plugs, make sure not to get the more common 75-ohm coaxial cable) to your transmitter and to the antenna. Your signal will be more efficient with a shorter length coaxial cable. Then use the chart included to set the length of the antennaís main pole to match the wave created by the frequency you choose. Here are a few antennae resources:
http://www.cometantenna.com/
http://www.qsl.net/sv5byr/slimjim.htm
http://www.pcs-electronics.com/en/guide.php?sub=antennas
You should also get a small SWR meter. SWR stands for standing wave ratio, and measures how efficiently your antenna is working. If it gives a bad reading, you adjust the length of your antenna to better match the wave of the frequency you are using. You hook it up in line with an extra coaxial cable between your transmitter and your antenna. Then you set it to “Forward,” and tune it to your frequency by moving the dial until the meter is at zero. Then flip it to “Reflect” or “Reflective Power” and see what your reading is. It should be as close to one as possible. You can adjust the length of your antenna to get a better reading, and send a more efficient signal. A frequency counter is also useful to insure your frequency is not fluctuating.
If your aim is to cover as much territory as you can, you want to mount your antenna as high as possible. Effective radiatied power (ERP) is measured by multiplying the power of your transmitter (how many watts) by the height of the antenna above average terrain (HAAT). The higher your FM antenna, the farther your signal will travel. Be careful hanging antennae, as winds will bring down any that are poorly installed. If your goal is just to cover a room or a building, you may not need an antenna, but can use a dummy load. A dummy load attaches to the coaxial connection on your transmitter in the same way as an antenna, and allows the electromagnetic power to leave the transmitter by dissipating all tranmistted power in the form of heat. It is basically a heat sink, that absorbs the energy created by your signal by simulating a antenna impedance of 50 ohms. You can buy one for $100-$200, or you can make one yourself with a coffee can, a few electronics, and vegetable oil to aborb the heat. You should have one to test your equipment, as you can use it without running at full power.
Audio source
Once you have a transmitter, antenna, and power supply, you are ready to send your transmitter audio. Never turn on your transmitter unless it is connected to the antenna, power supply, and an active audio source. That audio source should never be too powerful, or overdriven, as that will cause your signal to be distorted. You should run your audio into some sort of audio mixer. You should never let that signal get into the red on your mixerís level readings. When your signal is in the red, it will sound distorted to radio listeners. If possible, connect a limiter/ compressor to the audio after it leaves the mixer and before it gets to the transmitter. This will eliminate the possibility of your signal distorting, sending even levels to your transmitter no matter who is using your equipment. Also, make sure that your audio wires are not crossing your electric wires, and keep them all neat and orderly to eliminate ground hums.
Other possibilities
Now that you have set up your microcast, consider integrating other transmissions into your project. Perhaps you want a remote studio, in a different location from your transmitter. Special relay transmitters are now being designed for microcasters that make this very easy. You could also use internet web streaming, cell phones, walkie-talkies (in the U.S., these frequencies are called Family Radio Services, or FRS) or Citizenís Band radios. All these forms can be reconfigured to accept line-in audio, or already come with everything you need to make an remote studio. Always check local regulations to see what is legal on these bands in your area.